|
LIMESTONE COMPOSITION
TILES
Installation
Instructions
General Instructions
Always store tiles in a
protected, dry interior area. Do not doublestack pallets. Keep the job
site, adhesives (GreenFloors Low VOC Adhesives), and tile at a minimum
temperature of 65°F and a maximum of 95° F for at least 48 hours before
installation. Maintain this minimum temperature during the installation and
for 48 hours after the installation to assure proper bond of the adhesives.
If you intend to cover a
concrete slab with resilient floor covering, always test the concrete slab
for the presence of moisture.
The required quantitative
test is the calcium chloride test ASTM-1869. Alternate test is ASTM F-2170
with a relative humidity level of 75% maximum. The maximum acceptable
moisture vapor emission specification is not to exceed 5 lb. per 1000 sq. ft
per 24 hours for all LCT when installed with GreenFloors Limestone
Composition Tile Low VOC adhesive. This only applies to GreenFloors
Limestone Composition Tile Low VOC adhesive. If any other adhesive is
specified or selected, follow the adhesive manufacturer’s warranty and
recommendations regarding acceptable maximum moisture emission levels.
Furthermore, this increase is only applicable to GreenFloors Limestone
Composition Tile and Commercial felt-backed resilient sheet products and not
any other GreenFloors Limestone Composition Tile. The maximum acceptable
moisture vapor emission level for all GreenFloors Limestone Composition
Tiles is 3lbs per 1000 sq ft per 24 hours. NOTE: Moisture testing can only
indicate conditions at the time of the test and cannot predict any future
changes in moisture levels. Neither GreenFloors nor the flooring contractor
can be responsible if moisture levels change in the future.
Install GreenFloors
Limestone Composition Tile only after the job site has been cleaned and
cleared of other trade apparatus that may damage the finished tile
installation. The lighting on the job site must be sufficient to permit
inspection and preparation of the underfloor, layout, installation, cleanup,
and final inspection of the tile. Always check the cartons to assure the
pattern number is correct and that there is sufficient quantity of tile for
the installation. Make certain the lot numbers are the same on all cartons.
To minimize any minor shade variation on large installations, mix and
install tiles from several different cartons. If the shade variation is
extreme, do not install the tile.
NOTE: Please be aware that
installing GreenFloors Limestone Composition Tile over existing flooring may
reduce its excellent indentation resistance.
Existing Resilient Floor
Coverings
To achieve maximum product
performance, GreenFloors Limestone Composition Tile should not be installed
over existing resilient floor coverings. In the rare cases where removal of
the existing resilient floor covering is not an option, the existing
flooring must be covered with appropriate porous underlayment.
WARNING: Do not sand, dry
scrape, bead blast or mechanically chip or pulverize existing resilient
flooring, backing, lining felt, asphalitc “cutback” adhesive, or other
adhesives. These products may contain asbestos fibers or crystalline silica.
Avoid creating dust. Inhalation of such dust is a cancer and respiratory
tract hazard. Smoking by individuals exposed to asbestos fiver greatly
increases the risk of serious bodily harm. Unless positively certain that
the product is a non-asbestos-containing material, you must presume it
contains asbestos. Regulations may require that the material be tested to
determine asbestos content. The Resilient Floor Covering Institute (RFCI)
document “Recommended Work Practices for Removal of Resilient Floor
Coverings” should be consulted for a defined set of instructions addresses
to the task of removing all resilient floor covering structures. For more
information, visit Resilient Floor Covering Institute at www.rcfi.com.
Tile Layout
You may position
GreenFloors Limestone Composition Tile either square or diagonal to the
room. In both cases, layout is critical. All border tile should be
relatively even width and, if possible, at least one-half of a tile wide.
Additionally, if you lay the tile on a diagonal, border tile color and/or
graining against the wall should be consistent within the area.
Adhesive Recommendations &
Application
GreenFloors Limestone
Composition Tile Low VOC adhesive developed specifically for GreenFloors
Limestone Composition Tile and provides a strong moisture-resistant. Use of
adhesives contrary to this recommendation is strictly the responsibility of
the flooring contractor and / or the adhesive manufacturer.
CAUTION: Solvent-based
adhesives are flammable. Refer to instructions on adhesive labels for
precautions.
Application
• Make sure the
sublfoor is clean of dirt, paint, oils, wax, etc. The subfloor must be
smooth and level before starting the installation.
• Maintain the
adhesive, tile, and job site at a minimum temperature of 65°F and a maximum
temperature of 95°F for 48 hours before, during and after installation.
• After you complete the
tile layout, apply adhesive to one-half of the work area. Exercise caution
to maintain the working lines. If necessary, restrike the working lines over
the adhesive after it dries clear.
•
Apply
GreenFloors Limestone Composition Tile Low VOC adhesive
with a trowel notched 1/16" wide, 1/32" deep and 1/32" apart. Adhesive can
also be applied
using a roller or brush.
•
Apply adhesive evenly, with no bare
spots or heavy puddles. Avoid overlapping edges of adhesive.
•
Before installing tile, allow adhesive
to develop tack and dry. This normally takes 45 to 50
minutes. Humidity and/or
subfloor porosity, however, always dictate the proper open time.
•
Set tiles firmly against adjoining tile
and press into adhesive. Do not slide tile into place.
•
You can remove fresh adhesive smears with
a cloth dampened with water. Dried adhesive may be
cleaned using mineral
spirits and a clean cloth.
Tile
Installation
After the adhesive dries, begin laying
tile at the intersection of the working lines. Place the first tile
squarely against the
working lines. Since the positioning of this tile determines the accuracy of
the entire
installation, it is critical to lay the starter tile exactly
on the lines.
Once
you have set the first tile firmly in place, begin laying tile outward along
both guide lines. Place
tiles firmly against adjoining tile and press into adhesive.
Do not slide into place. Keep tiles on the
guide.
After
you have positioned several tiles along the working lines, begin
stair-stepping tiles into the field area. This will keep tiles square to
each other throughout the installation. Lay tiles up to where border
tiles must be cut
to fit. Apply adhesive to the second half of the work area, let it dry
clear, and then
continue laying tile.
Cutting
&
Fitting Border Tiles
You may cut border tile to fit using
several techniques. The most common technique for square layouts is
to place a full tile
directly over the last full field tile. Using another full tile placed
firmly against the wall
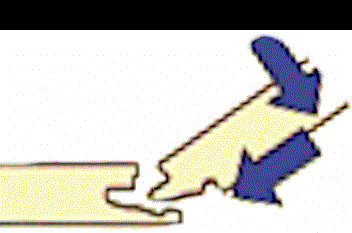
and over the border tile, score the border tile. Be certain
the graining of the border tiles is properly
aligned. Cut the border
tile along the scored line and position factory edges of tiles together with
the cut edge against the wall.
Use a template cut from stiff cardboard
or hardboard to cut border tile in diagonal layouts.
For
GreenFloors Limestone Composition Tile
12”, cut the template to the diagonal dimension of the tile,
approximately 17” square.
Use accurate
measurements to measure and cut the template.
Use the
template in place of the
tile and proceed as outlined above.
You
may direct scribe or pattern scribe the border tile for irregular walls,
pipes, etc. For intricate cuts, we
recommend you heat the
tile from the back and cut with a sharp utility knife along the scribed
marks.
Finishing &
Maintenance
•
Do
not wash the newly
installed tile for 4-to-5 days after installation to allow the floor tiles
to bond to
the underlayment / subfloor.
•
Keep heavy furniture and equipment off
the floor for at least 48 hours to allow the adhesive to set.
•
Sweep or vacuum thoroughly, and remove
any residual adhesive with a clean white cloth
dampened with mineral
sprits.
•
Apply a minimum of two coats of a
high-quality cross-linked acrylic floor polish to temporarily
protect the floor until
regular maintenance procedures can begin. |